| The Black Wyrm's Lair Terms of Use |
 Help Help
 Search Search
 Members Members
 Calendar Calendar
|
 The Black Wyrm's Lair - Forums > Mod development resources & discussion > Tutorials, hints & tips > Graphics-related tutorials

 Nov 14 2004, 08:18 AM Nov 14 2004, 08:18 AM
Post
#1
|
|
|
The Raven  Mod Developer Posts: 590 Joined: 4-September 04 From: California, USA |
I posted this in the Graphics Department forum, then realized it should be here too. Fits in both places I guess.
OK. So we can make our own inventory bams simple, but we might get intimidated by description bams. While they may seem difficult, they are actually quite easy. First off, I recommend you go download the latest version of Paint Shop Pro. You do need to purchase it though... Requirements: Paint Shop Pro Bam Workshop(1 preferably) DLTCEP Now that you have Paint Shop Pro(PSP) open up the original image file that you used to make your inventory bam. This picture should be about 165x165 pixels in dimensions. Now, depending on what your image is surrounded by, you can either use the background eraser or just crop the image. I recommend cropping the image because it is will keep the next step within the cropping boundaries. OK, so now you've cropped the image, and while the image still has the dashed line going around the selection go to the upper bar, the one with "File", "Edit", etc. and select Effects -->Art Media Effects-->Pencil. Now you want to adjust the image to where it is all the way black and white, but to where you can still see a lot of detail from the image. Now, open up DLTCEP, or if you know a description bam already in the override folder, skip to the next step. Now that you are in DLTCEP select Edit-->Animation now that you are in the animation editor, select Load Bam from the bottom right corner. To find a description bam look in the files beginning with "c" and they should mostly be description bams. Now open up that bam, and select "Save as" and save it as whatever you want and wherever you want. For the purpose of this tutorial, we're saving it in C:. Open up Bam Workshop(BW) and load the bam that you just saved in C:. there is only one frame, export that frame as a .bmp. Now you open up Paint Shop Pro and load the bmp that you just saved. Select the color that you want your sword(or whatever you are making the bam of) to be closest too using the eyedropper on the actual sword part of the bmp. I recommend, if using a scale of 1 being the brightest color and 5 being the darkest, selecting a "2.5". Now we go back to the "Pencilized" sword that we did a while back. Go over to the toolbar on the left and select the airbrush(it's in a dropdown menu off of the paintbrush utility). Now set the opacity to somewhere between 50 and 65. Now lightly color in the sword. Now that that is done, the sword may look to covered up. If it does, go back to the exported frame from the premade description bam and select the darkest brown color. now select the paintbrush utility and set the size down to 1 pixel. Go over to your sword and fill in the details that you think should be better. Also, when using the airbrush, it is possible to set the density of the spray lower. I recommend about halfway down. -------------------- And can we finally say that the bhaal spawn idea has had the final nail hammered in its coffin?
Member of the World Transition Project And the raven, never flitting, still is sitting, still is sitting On the pallid bust of Pallas just above my chamber door; And his eyes have all the seeming of a demon's that is dreaming, And the lamp-light o'er him streaming throws his shadow on the floor; And my soul from out that shadow that lies floating on the floor Shall be lifted - nevermore! Like dealing with terrorists by giving them explosives |
 |
|


 |
Replies
|
Nov 25 2004, 12:02 AM
Post
#2
|
|
|
The Raven Mod Developer Posts: 590 Joined: 4-September 04 From: California, USA |
And another description bam tutorial... Hopefully this will be the last. Though, the way I'm going, it won't be.
This tutorial is in html for which you can download at the bottom of this post. First, find an image. For this tutorial I am supplying you with a sword. Here it is:  I will be performing all of the actions in this tutorial along with you, so this is exactly how it is done. 1. Open up the sword in Paint Shop Pro(There is a 9, but I'm still using 8). 2. Go to the Image menu on the top bar(you know, the one with "File","Edit","View", and all that goodness) I will be refering to this by the name Top Bar. Now go down until you see the words "Increase Color Depth" and it has a little submenu. Go into the submenu and select the 16 million colors option. Note: this may be ghosted, if it is don't worry, it means that the image is already set to this. Now there are two ways you can do the next step, but I'm going to tell you which one that I do. 3. Go to the Effects menu on the Top Bar and select it. Go down into the submenu of Art Media Effects, which should be near the top. In that submenu is a selection called "Black Pencil" and you want to select it. Note: I just figured this out. I was using "Charcoal" at the start of the tutorial which works just fine. 4. A window will now pop up with two screens on it. The one on the right is the before, and the one on the left is the after shot. Put detail at 100 and Opacity at 100. This will give you an image that looks like this: 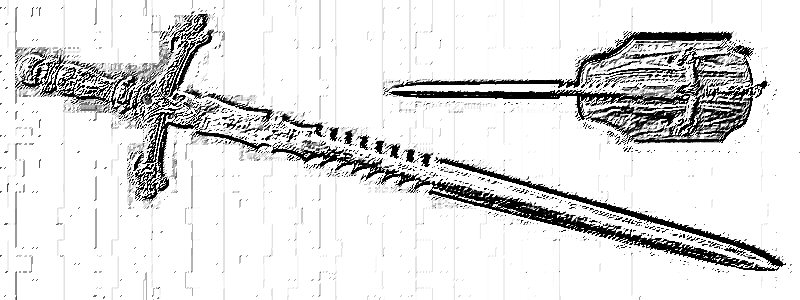 Aren't you glad that you have Paint Shop Pro? 5. Now for the calm before the storm. Crop out a small amount of the sword. Preferably the hilt so you can keep consistency with the description bams already in the game. Here is what I am using: 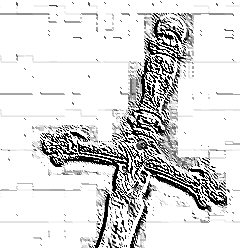 6. Now, go back up to the Top Bar and go to the Image menu again. This time go to "Rotate Clockwise 90" This is perfect because that is almost exactly the angle that all the other swords in the game are pointing. 7. Take a deep breath. 8. Select Paint bucket from wherever it is on your toolbar. We all understand this tool I'm sure. The color that I use for this step is the 0,151,151 turquoise color. In case this is you first bam ever and don't understand this stuff, here is a quick lesson. Red:0; Blue: 151; Green: 151. In order to get these colors click on one of the two colors that you have selected. This will open a dialogue box. In the bottom left hand corner there are three rows of numbers. They are labled R, G, and B, AKA Red, Green, Blue. I'm sure you can guess the rest from here. 9. Zoom into 400 to 600 percent. With your paint bucket selected fill in all the white spaces you can. It is best to get rid of all of it and to just leave the black bit. But you may wish to leave some of the gray. Also, don't worry about the part that is right next to the bottom of the image. That won't be there later. Your new result should look something like this: 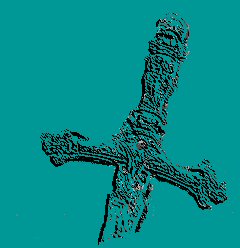 10. You will notice that there are some lighter spots in there. I don't get rid of all the gray spots. This will give more appearance of being a little sketch, which I assume was Bioware's goal. Notice how I didn't touch that bottom part? That's because we will be getting rid of part of that, as the swords are in the games. 11(AKA The real step 10). Clean up around this part as well as you can without stressing out over it. Select the Air Brush tool. This tool is on the image editing toolbar. Select the little submenu and you will see three options. Select the Air Brush one. 12. Set the Size to 24, Hardness and Opacity to 100(OPACITY AND HARDNESS MUST BE SET TO THIS IN ORDER FOR IT TO BE INVISIBLE), Step to 10, Density to 24, Rotation to 0, and Blend Mode to Normal. 13. Go to the bottom of the image and catch the blade at an angle and cut it off as shown in the next image. 14. Now go through the remaining bit of the bottom and make sure there are no light green or white spots left. This has already been done in the last image. 15. Click on the drag bar of the image. Go to the Edit menu on the Top Bar and select Copy. 16. Start a new image. For the dimensions set Width to 175 and height to 175. These are good dimensions for our current bam, but they can change depending on what you are using or whatever your preferences are. A larger image makes Step 18 much quicker and less infuriating. 17. Using the cropping tool select the whole entire new image and then go to the Edit menu on the Top Bar and go to the Paste submenu and choose "Paste into Selection" 18. Exhale your last deep breath and take a new one. Now go through and do basically what you did in step 9, but this time you are going to be getting rid of all the green that isn't quite the right color. Here is the new result: 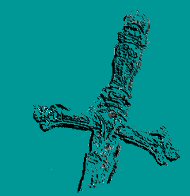 And now, just to double check we are going to open up Bam Workshop. For a tutorial on making bams, I suggest Sir-Kill or Seifer's(I think he wrote it) tutorial on inventory bams. Or you can just follow the one I'm making here which is much better since it is directly associated with description bams. Actually Making the Bam Open up Bam Workshop. I prefer the first one, BWII makes no sense to me and just totally ruins bams. At least that's what I think. Of course I have no right to insult them as I can't write a program like that. Anyways... onto the tutorial. 1. On the right hand side of the screen there are two tabs. One says Sequences the other says Frames. Right click inside the window of the Sequences tab. Select "Add Sequence" and a sequence will be added. 2. Click on the Frames tab and right click in the window and select "Import Frame" 3. A browser will open up. Find the frame that you just made in PSP, which should be saved as a .bmp, click "Open" 4. Now to do some more touchup on the image. Select the "Masked Eraser in the upper right hand of the left toolbar. 5. Make your primary color(the one that shows up in the palette on the bottom of the screen to be on top) the transparent pink. 6. Make your secondary color any colors that are not the transparent green. This is requires good perception to do this. 7. Check your bam by clicking the preview button below the window that displays the frames and sequences. 8. Repeat steps 6 and 7 until you are entirely satisfied. 9. Save the bam as whatever. 10. Read a DLTCEP tutorial. There is one at igi's forum: http://forums.mcwrench.com -------------------- And can we finally say that the bhaal spawn idea has had the final nail hammered in its coffin?
Member of the World Transition Project And the raven, never flitting, still is sitting, still is sitting On the pallid bust of Pallas just above my chamber door; And his eyes have all the seeming of a demon's that is dreaming, And the lamp-light o'er him streaming throws his shadow on the floor; And my soul from out that shadow that lies floating on the floor Shall be lifted - nevermore! Like dealing with terrorists by giving them explosives |
|
|
|
Posts in this topic
 Awake Description Bam Tutorial Nov 14 2004, 08:18 AM
 egm NULL Nov 18 2004, 02:28 PM Awake NULL Nov 21 2004, 05:09 AM Dellaster NULL May 16 2005, 04:02 AM bitesh OK. So we can make our own inventory bams simple,
... Jan 25 2008, 10:57 PM Sir-Kill welcome to BWL!
as far as I can tell bit map... Jan 26 2008, 03:54 AM bitesh yeh, thx. I didn't mean to be an ungrateful di... Jan 29 2008, 12:03 PM
egm NULL Nov 18 2004, 02:28 PM Awake NULL Nov 21 2004, 05:09 AM Dellaster NULL May 16 2005, 04:02 AM bitesh OK. So we can make our own inventory bams simple,
... Jan 25 2008, 10:57 PM Sir-Kill welcome to BWL!
as far as I can tell bit map... Jan 26 2008, 03:54 AM bitesh yeh, thx. I didn't mean to be an ungrateful di... Jan 29 2008, 12:03 PM Sir-Kill I do not think that BWS works on a mac
BTW someone... Jan 29 2008, 02:10 PM
Sir-Kill I do not think that BWS works on a mac
BTW someone... Jan 29 2008, 02:10 PM |
1 User(s) are reading this topic (1 Guests and 0 Anonymous Users)
0 Members:
 |
Lo-Fi Version | Time is now: 6th June 2026 - 09:04 PM |